
OpenGame guide
AI Game Development: Building Zhaoye, a Wuxia Game
How we built Zhaoye: AI character models, Tang-dao concept art, three image-to-3D trials, Blender modeling, and combat in a wuxia browser game.
 OpenGame Team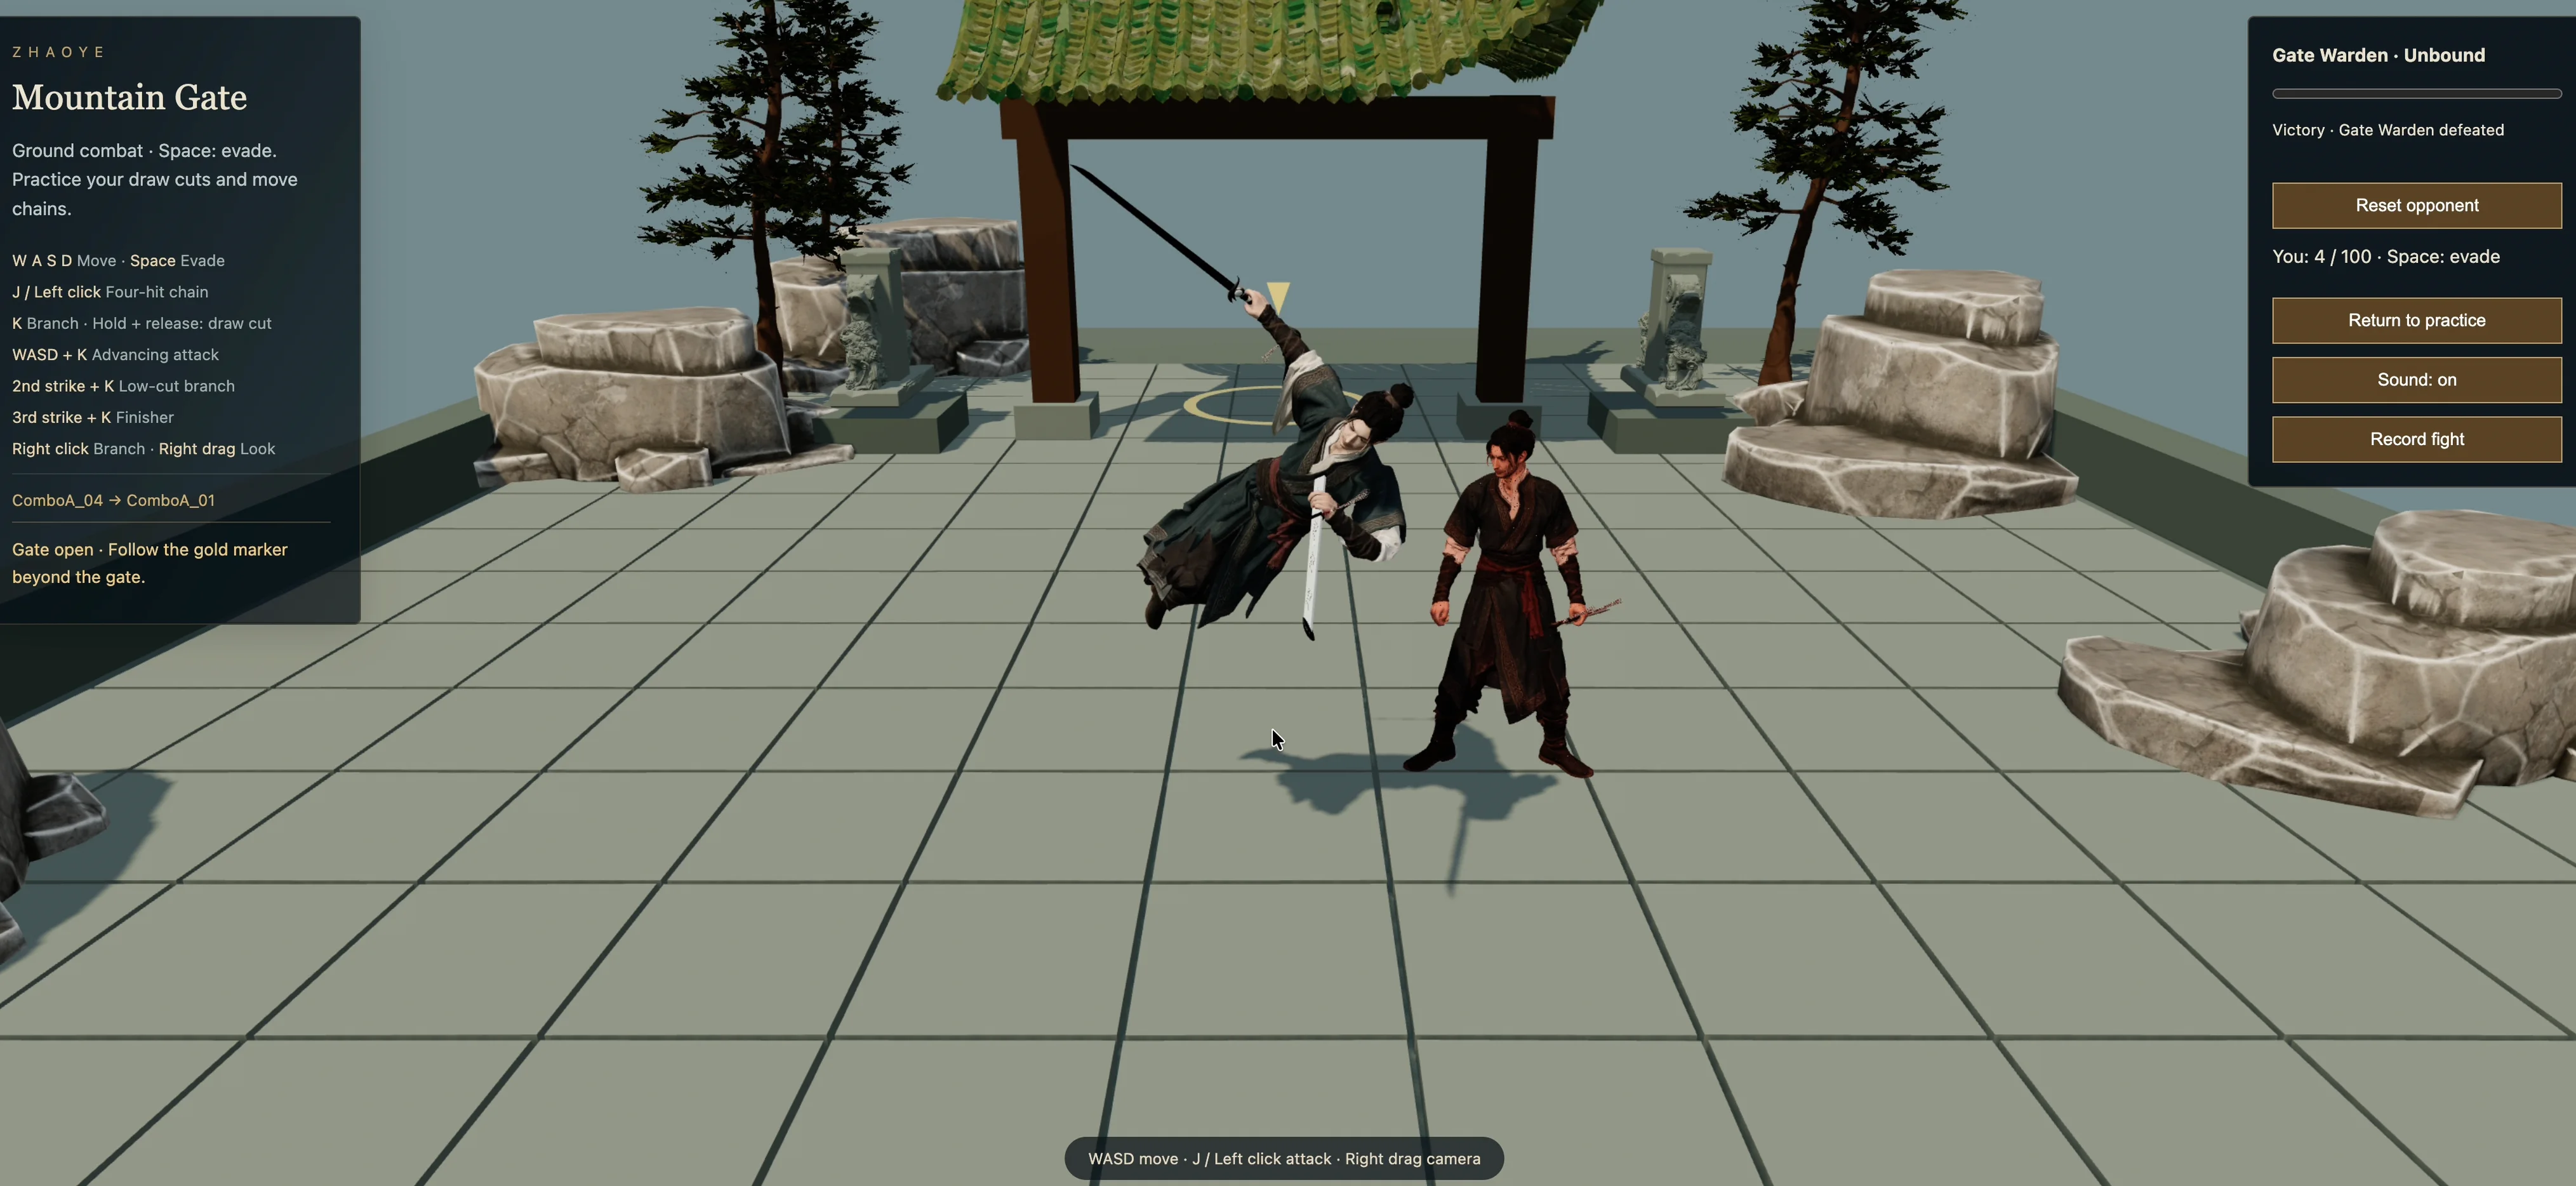
Play Zhaoye — Wuxia Mountain Gate. This desktop keyboard-and-mouse demo contains one boss stage and loads about 61 MiB of assets when launched.
A convincing character image was only the beginning of Zhaoye (照夜), our Chinese martial-arts browser game. The swordsman still had to walk, grip a blade, draw it from a scabbard, and respond when a player pressed a key.
That journey took us through AI character modeling, 21 weapon-design images, three image-to-3D blade trials, and twelve Blender modeling revisions. The result is a desktop stage built around one boss fight, an exit, and a retry loop.
This AI game development case study follows the decisions behind that stage: where generated assets helped, where precise modeling became necessary, and how the separate pieces became playable. Wuxia—the Chinese martial-arts storytelling tradition—gave us the visual and combat direction; repeated testing shaped the implementation.
An airborne moment within the attack animation. The stage has no separate jump control.
Watch the stage in action
This silent recording shows practice attacks, the Gate Warden duel, and the open gate after victory. Watch it first to see the movement and attack chains, then try the desktop demo. The recording shows the playable stage; it is not a frame-rate benchmark.
Start with the action you want to preserve
The project began with a specific interest in Tang-dao combat: a Chinese swordsman carrying both blade and scabbard, deliberate draw attacks, and connected ground attacks. The longer design included a chapter with several enemy roles. We focused the playable milestone on a single gate encounter.
Keeping that scope manageable meant making cuts. Jumping was removed, and a running iteration that looked wrong was left out of the selected locomotion build. We concentrated on grounded movement and connected attacks.
For this stage, the useful question was: can the player enter a duel, make understandable decisions, win or lose, and start again?
Give the image a clear job
For the character image-to-3D trials, we used a clean front-facing reference. The modeling input temporarily omitted the hat and weapons, leaving those as separate asset concerns. This made the character trial easier to inspect without asking one reconstruction to solve the body, clothing, blade, and scabbard together.
Our design notes also separated appearance references from structural evidence. Independently generated front, side, and back images can disagree about clothing. The workflow therefore called for reviewing multiple views rendered from the same generated mesh, with hidden surfaces still treated as something to inspect.
The reference established silhouette, clothing layers, and color. Animation required a skeleton and skin weights—the values that determine how strongly each bone moves the surrounding mesh—followed by checks of finger contact and the draw motion.
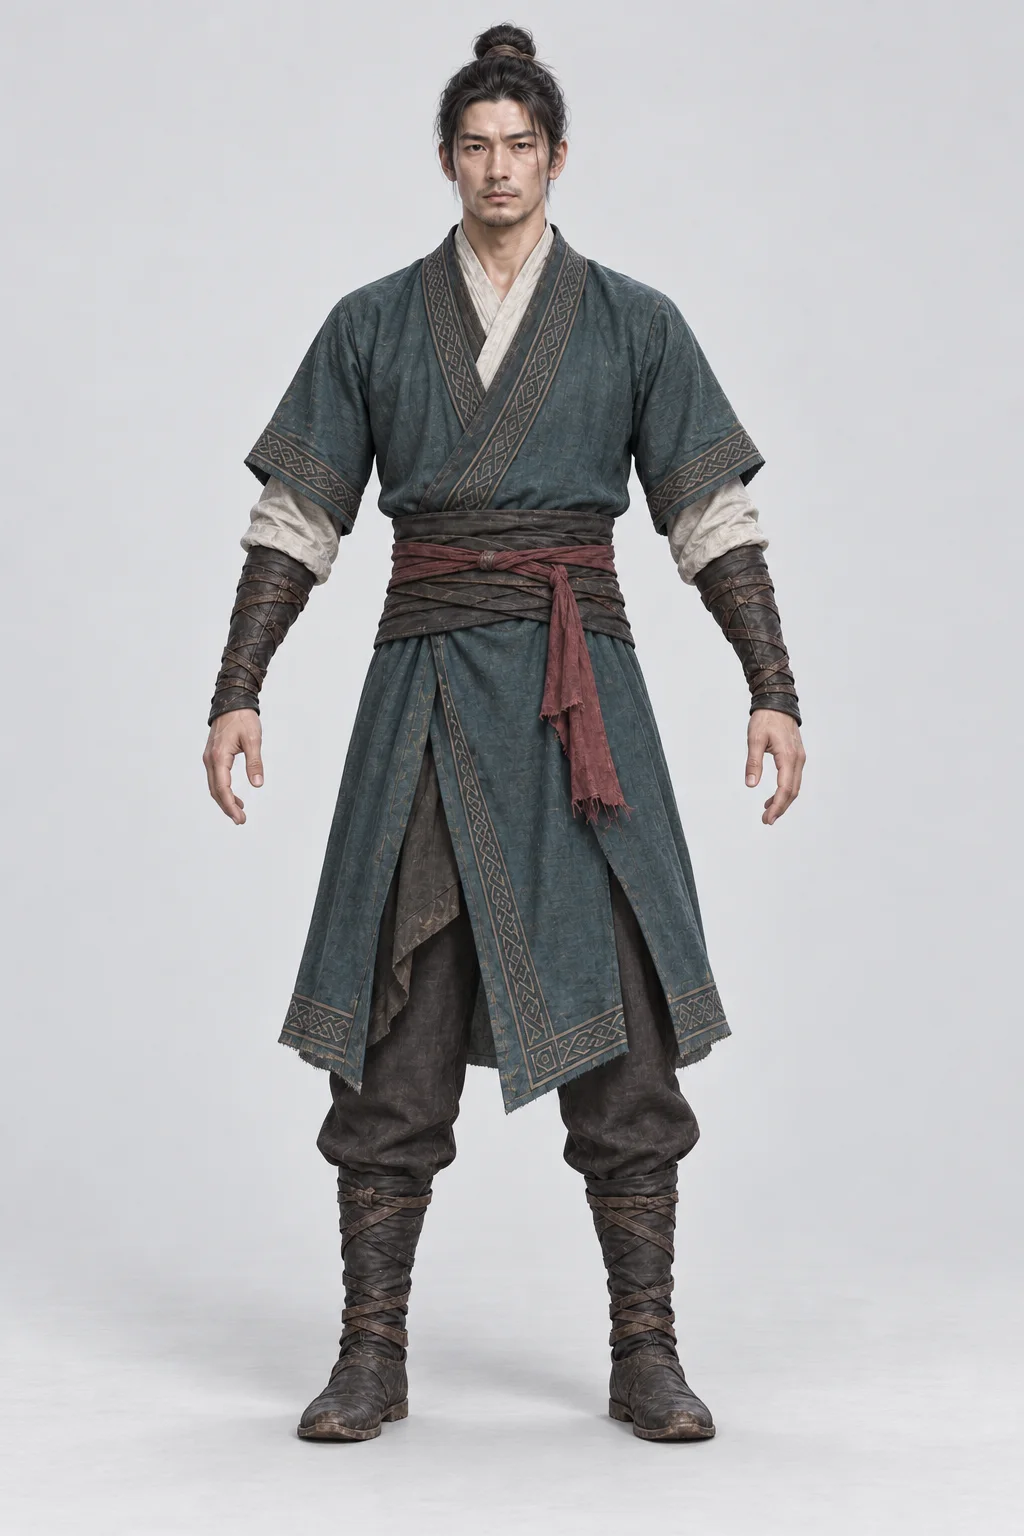
The production reference used to inspect the character separately from the hat and weapons.
Compare the character models beyond their appearance
The recorded trials produced very different static meshes:
| Trial output | Measured triangles | Skeleton in the inspected output | | --- | ---: | --- | | Hunyuan 3.0 Normal+PBR | 495,502 | None | | Seed3D 2.0 | 499,984 | None | | Meshy Playground | 1,952,732 | None |
These are measurements of our individual samples, not a general ranking of the services. The Hunyuan and Seed3D comparison also recorded differences in silhouette, cloth appearance, and reconstructed faces. A more detailed surface did not resolve the missing animation structure.
A Meshy working copy was later reduced to 249,999 triangles and exported as an approximately 11.8 MB GLB for a local viewer check. That was a static modeling milestone. It did not demonstrate animation-ready topology or natural deformation, and it was not the final game's complete download size.
We kept original files unchanged and worked on derivatives. This made it possible to compare an optimization or binding attempt against the asset it started from.
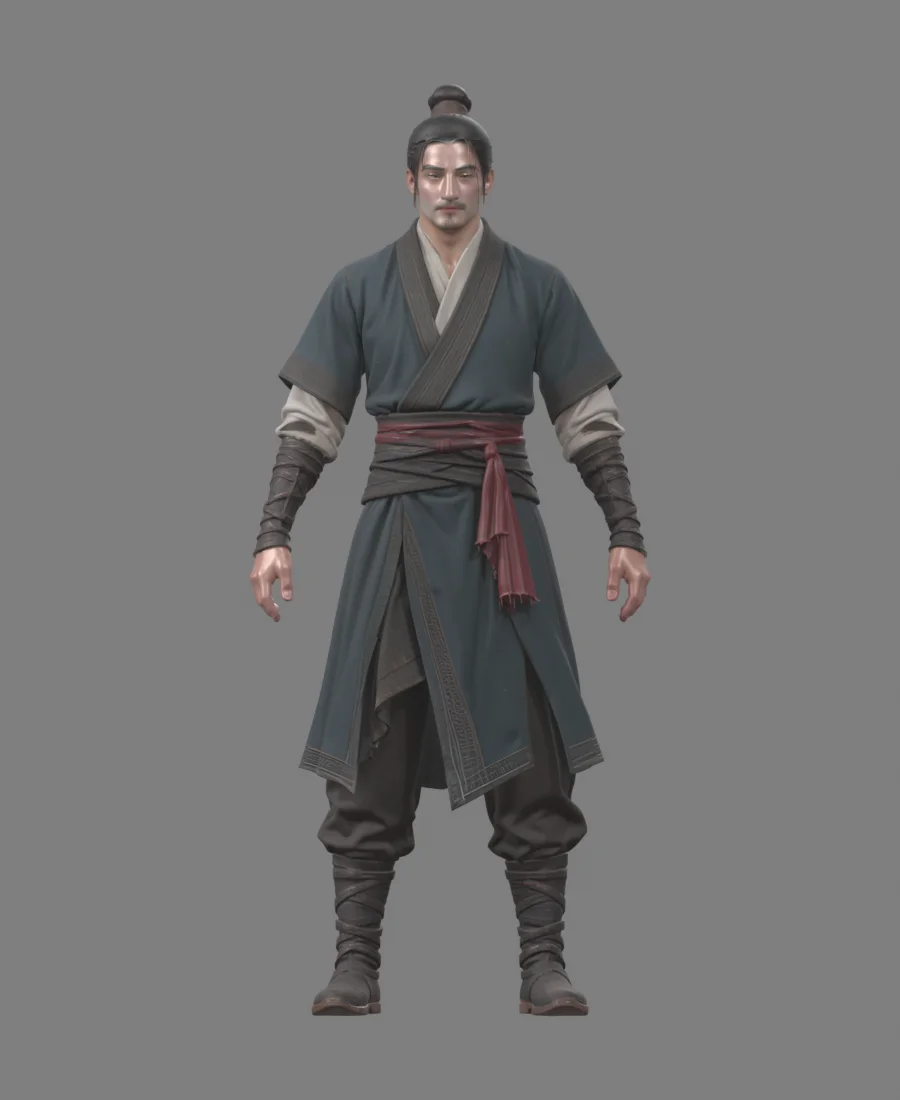
The Hunyuan character trial, rendered before rigging and animation checks.
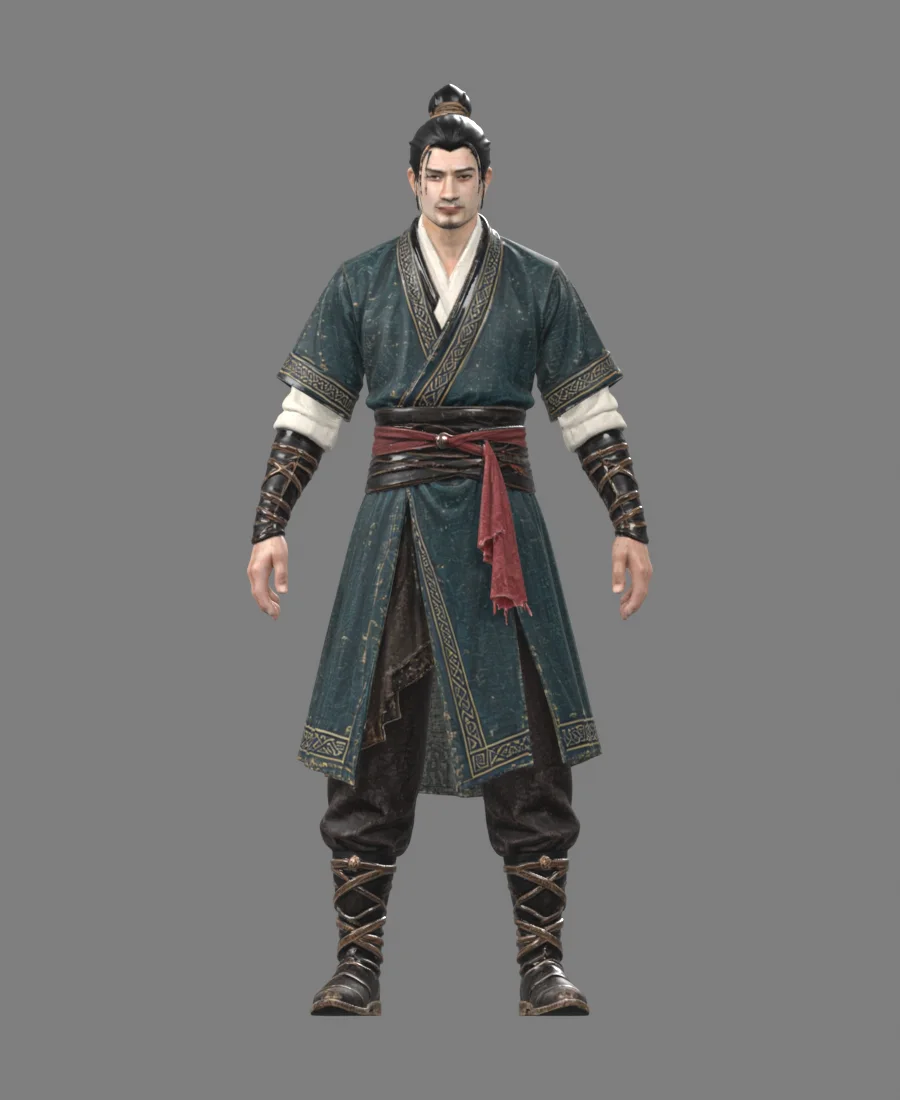
The Seed3D character trial from the same reference, with different treatment of the face, cloth, and ornament.
Designing the Tang-dao through 21 image iterations
The weapon began as an image-design problem before it became a mesh problem. The archive preserves 21 weapon images, from the first isolated blade and scabbard studies to the approved concept V17 and two later experiments. Concept versions and Blender model versions use separate numbering.
The early isolated input read more like a straight sword than the Tang-dao we wanted. More constraints had made the design easier to describe but less convincing. The work returned to the character's weapon, explored a more ornate direction, then converged on cloud motifs, silver ornament, dark lacquer, and red ties.
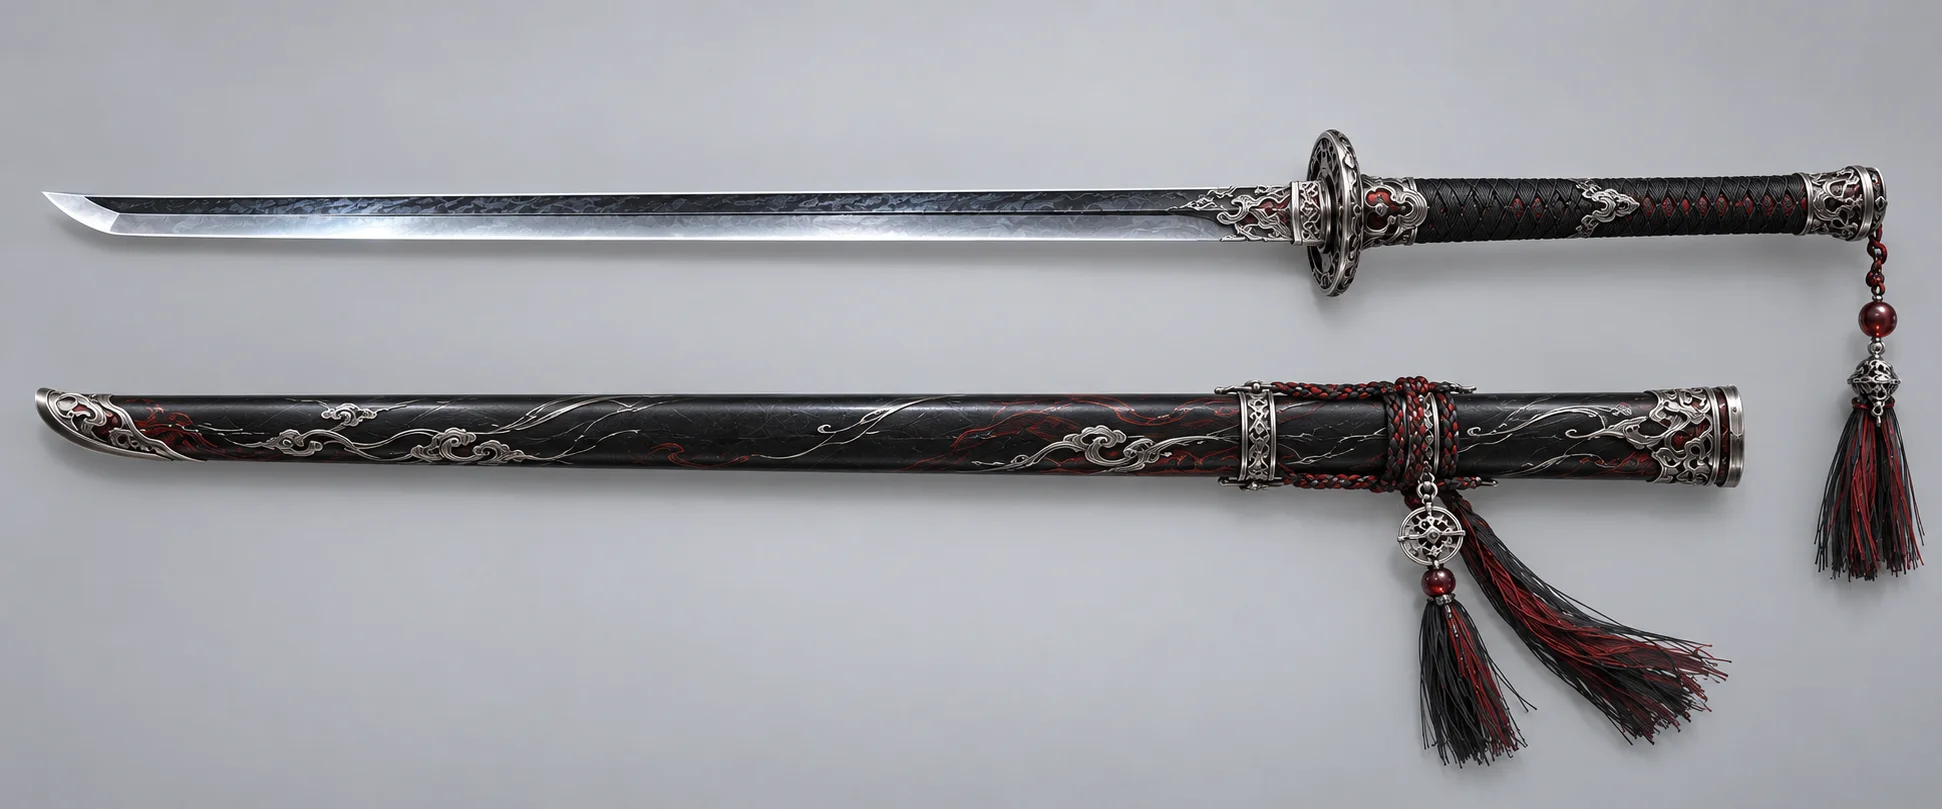
Concept V6 established an accepted wuxia alternative.
Moonwhite V7 introduced the palette that carried forward: pale surfaces and cool silver, dark contrast, and small red accents. The useful reference was this material relationship, not a requirement to amplify every jade ornament.
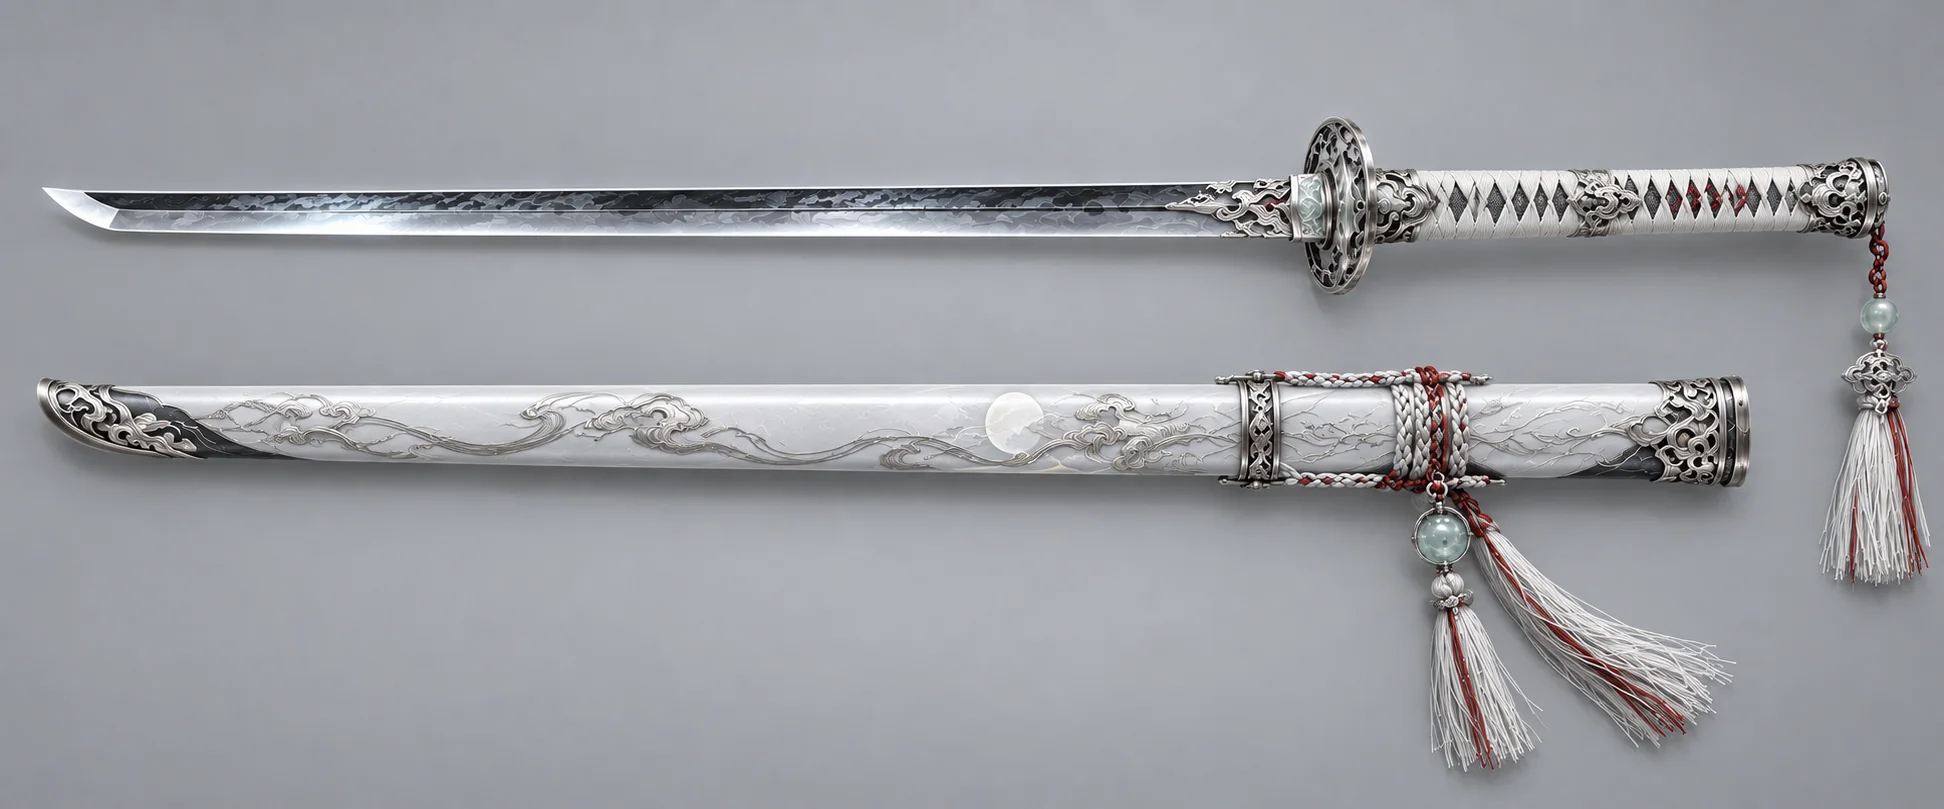
V7 became the principal color and surface reference.
| Concept stage | Decision | Reusable lesson | | --- | --- | --- | | V1–V3 | Separate blade and scabbard, explore action, reject the isolated V3 design | Approve appearance before committing to reconstruction | | V4a–V5b | Explore traditional fittings and ornate black-and-silver designs | Judge the whole silhouette before individual details | | V6–V7 | Keep wuxia and Moonwhite alternatives | Preserve accepted visual qualities | | V8–V11 | Study a creator-supplied Siming reference, combine its outline study with Moonwhite; reject V11 | Give each reference a specific job | | V12–V14 | Straighten the blade, slim the scabbard, adjust the pommel | Name the blade tip, pommel, and scabbard end separately | | V15–V17 | Fix the structural reference, refine tassels, restore the scabbard-end direction | Make bounded edits from an accepted base; approve V17 | | V18a–V18b | Try reversing end details without reliably achieving the blade-tip change | A newer output does not automatically replace an approved design |
The important prompt change was to assign one image to shape and composition, and the other only to color, materials, and ornament. Ambiguous requests about the weapon's “bottom” also needed a marked close-up: the pommel and the scabbard end are different components.
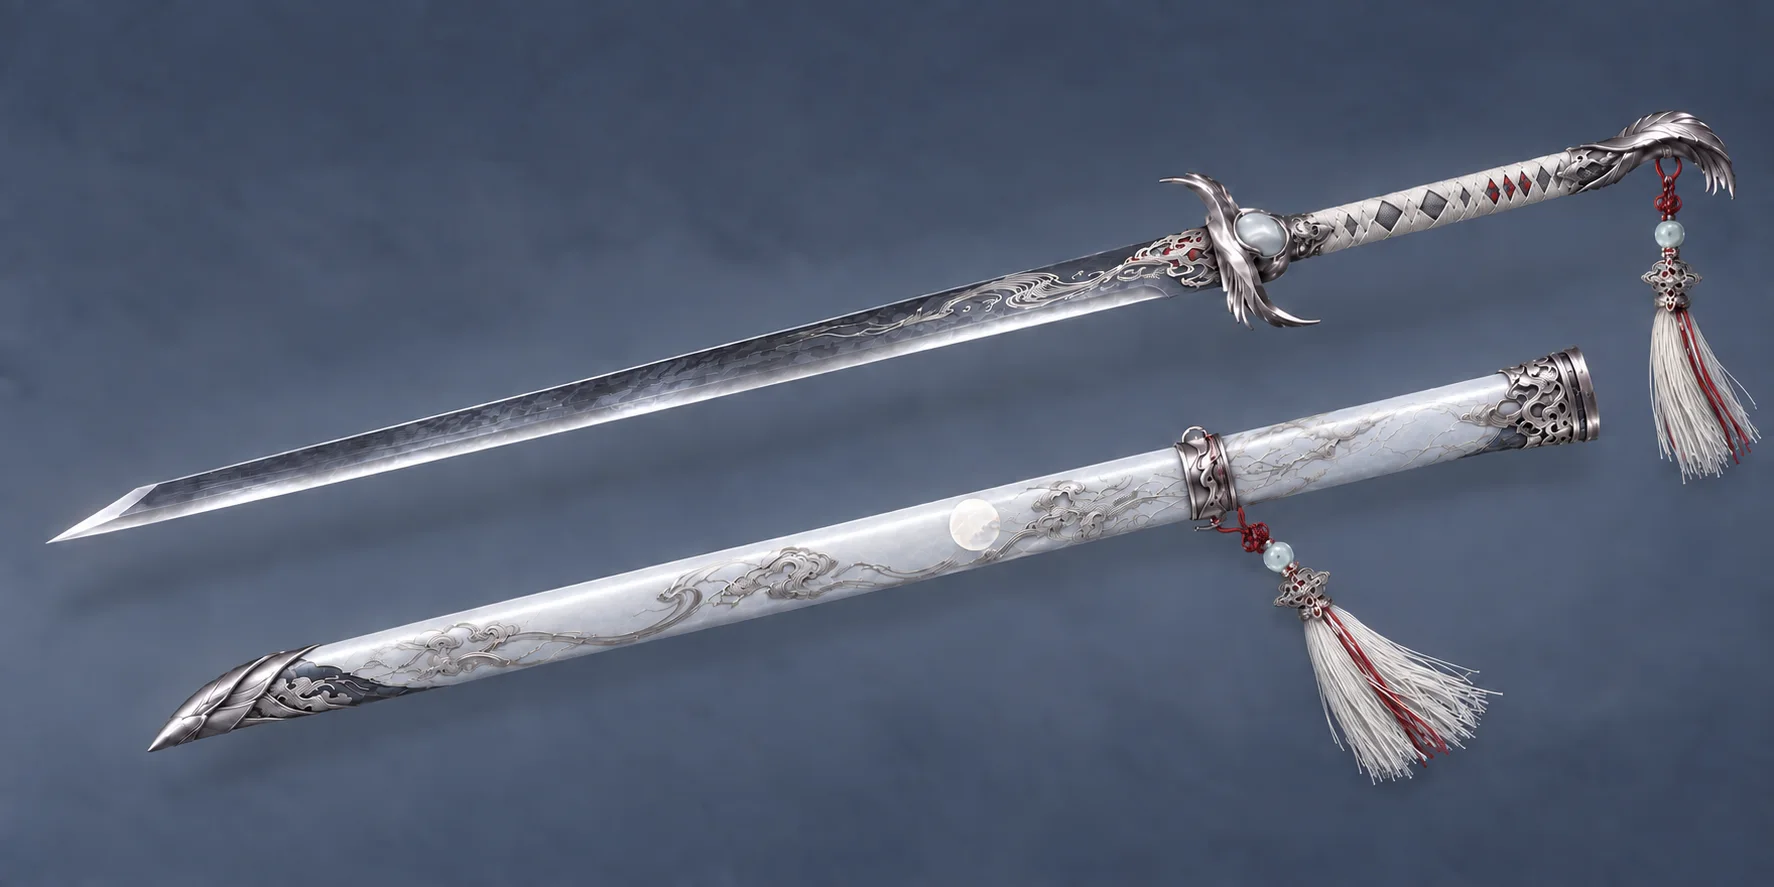
V17 was the visual design milestone, followed by separate reconstruction and modeling checks.
The prompt pattern we would reuse is:
Start from the accepted image. Change only [named region] from [current shape] to [target shape]. Preserve the remaining proportions, materials, ornament, and composition. Use the second reference only for [its specific role].
After each edit, compare both the requested change and any unintended drift. This template summarizes the workflow; the original concept images came from the built-in image-generation tool. Tencent Hunyuan entered the process during the later image-to-3D trials.
Comparing three image-to-3D versions of the blade
The Tang-dao itself also went through Seed3D, Tencent Hunyuan, and Meshy trials. A separate blade image was prepared from the approved visual. The scabbard was not generated in this comparison.
| Blade trial | Triangles | GLB bytes | Recorded observation | | --- | ---: | ---: | --- | | Seed3D 2.0 medium | 270,666 | 17,632,260 | Better preservation of pale color, diamonds, and red accents; tassels became coarse sheets | | Hunyuan 3D 3.0 PBR | 499,958 | 47,173,864 | Broad silhouette retained; coarse tassel strips and reduced surface detail | | Meshy 5 Standard | 31,135 | 8,895,200 | Blurred ornament, thick tassel masses, and an extra floating tassel |
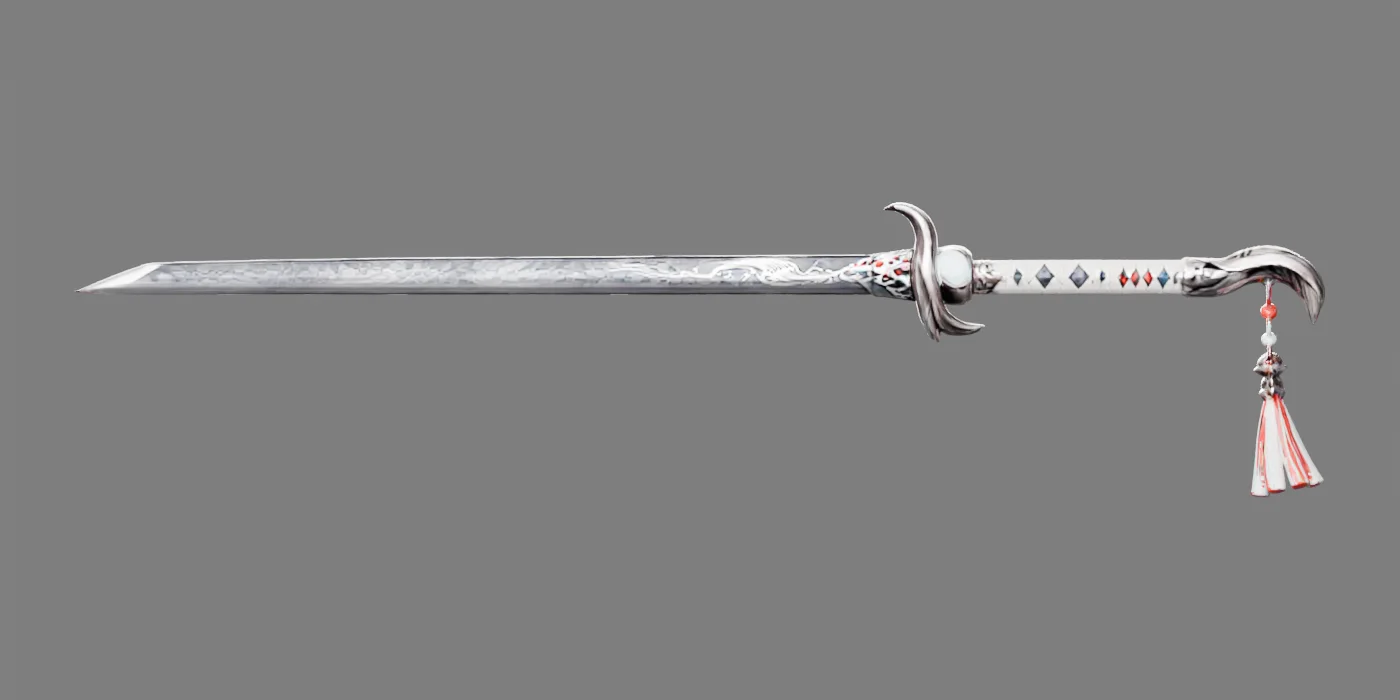
Seed3D was the preferred repair candidate in this specific review.
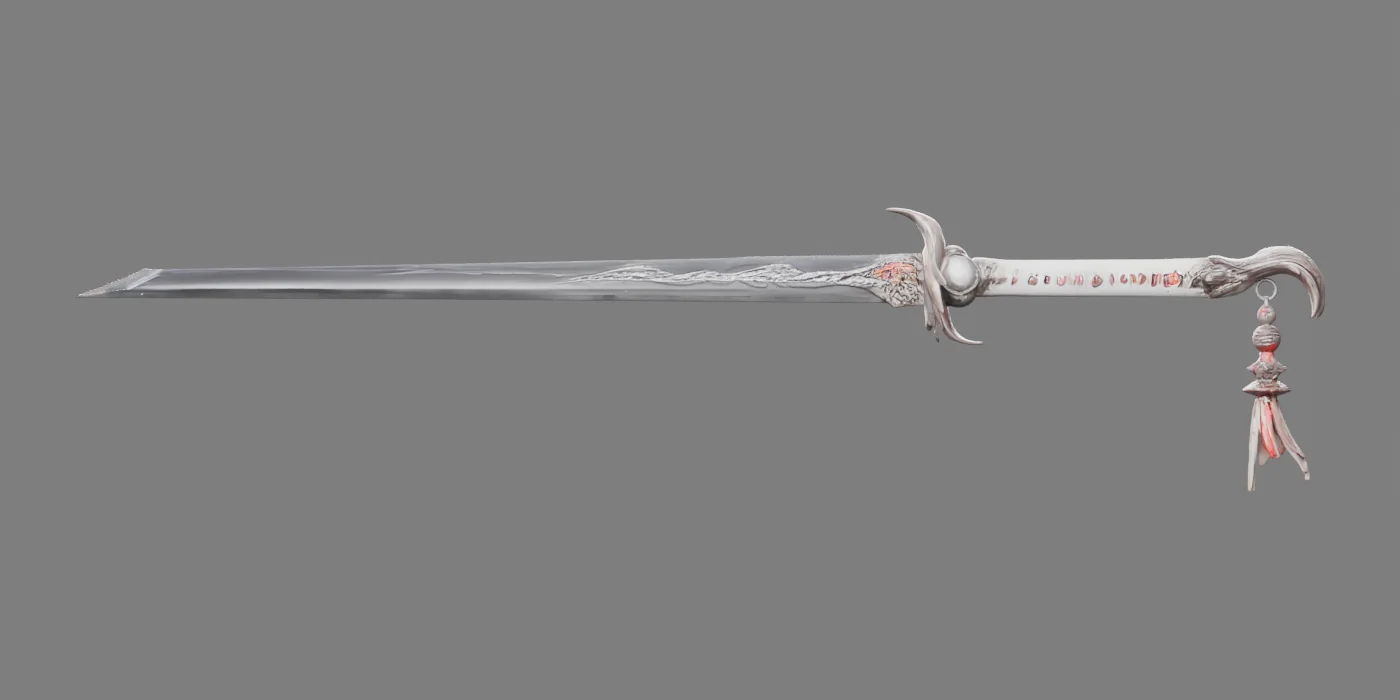
Hunyuan retained the main outline while simplifying fine details.
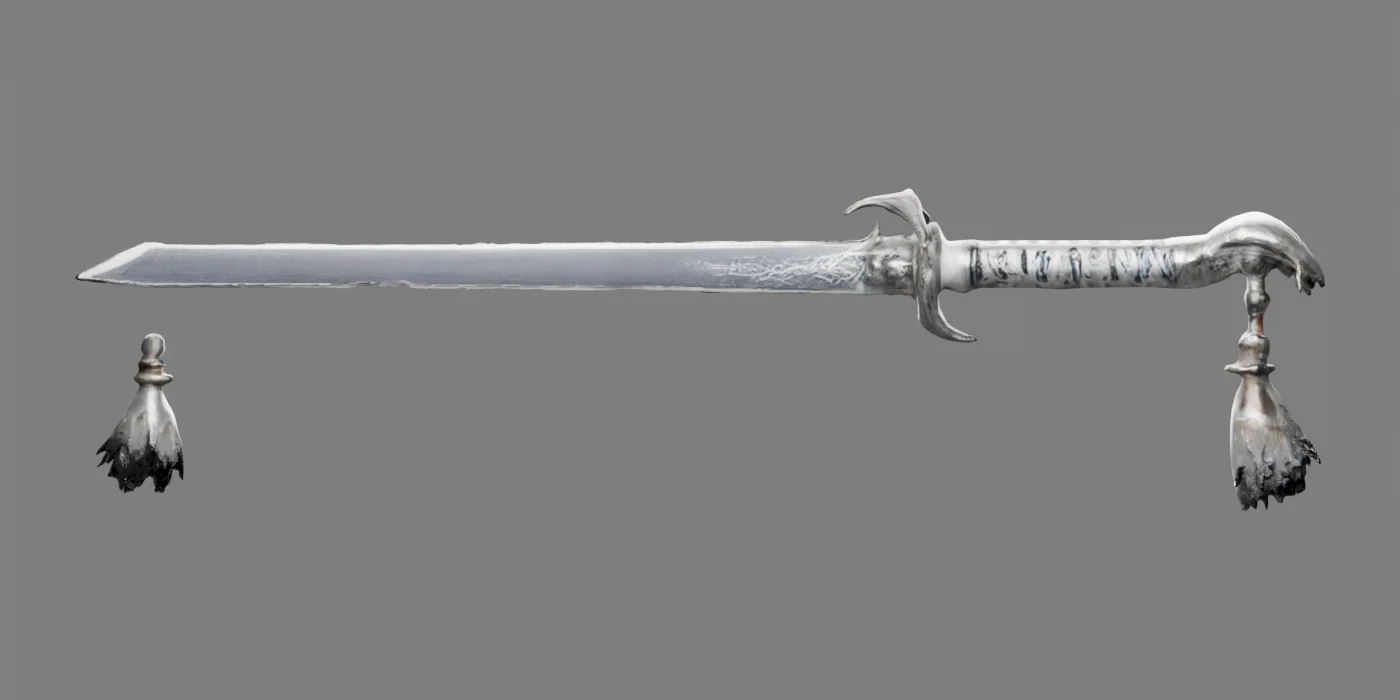
The additional tassel on the left was an actual defect in this sample.
This was not a controlled same-input benchmark. Hunyuan and Meshy received the same 3:1 blade image. Seed3D rejected that aspect ratio, so its input was expanded to 2:1 with an image tool, potentially repainting details. Model versions, triangle counts, and texture settings also differed. None of the three samples passed as the finished weapon.
The useful decision concerned repair work: blade thickness, guard volume, separated tassels, and the eventual scabbard fit still needed precise control. Those became concrete goals for Blender modeling.
Modeling the blade and scabbard in Blender: V1–V12
The manual construction began with blade, guard, and pommel silhouettes. Thickness, handle wrapping, ornament, an interior scabbard cavity, and attachment points followed as individually inspectable parts.
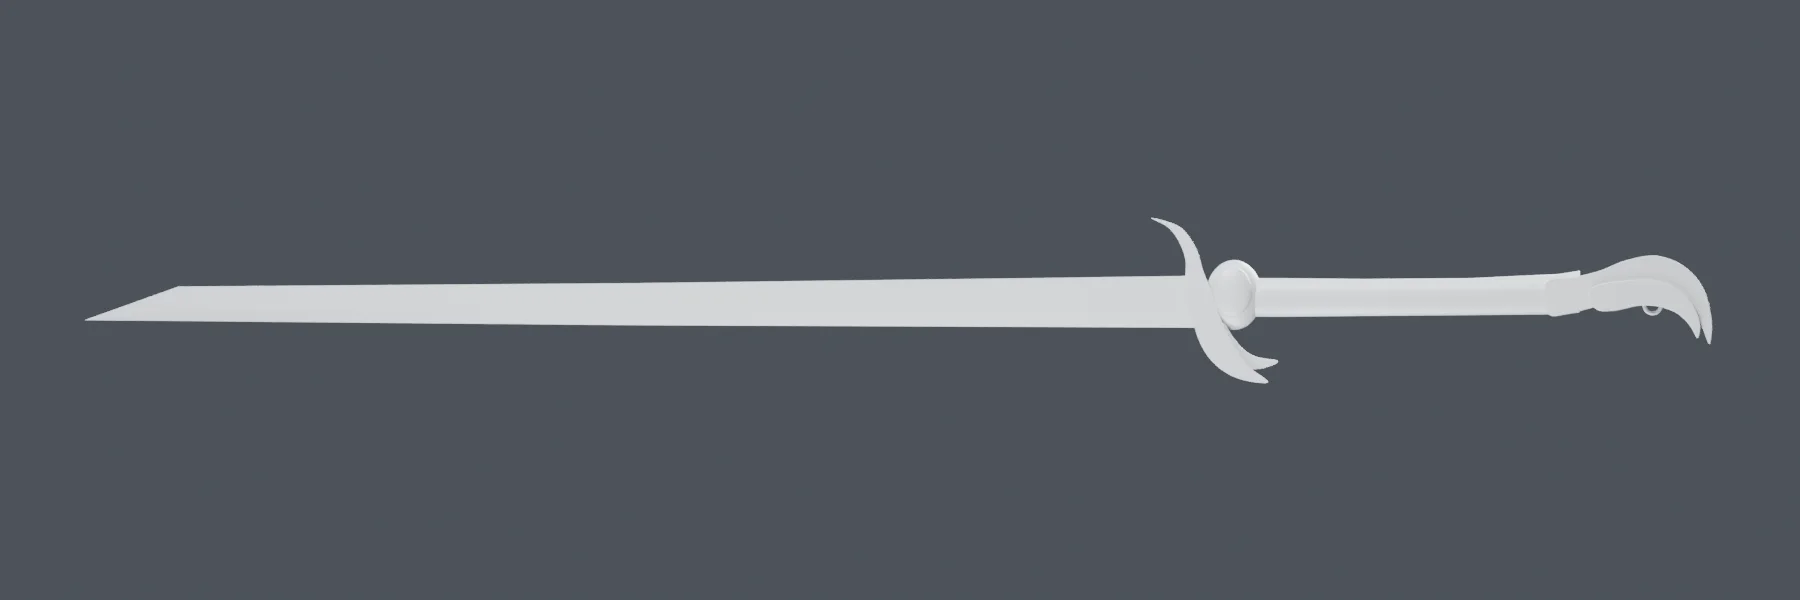
The first gray model exposed the proportions and the still-flat guard and pommel.
| Model | Change | Purpose or lesson | | --- | --- | --- | | V1 | Basic blade, guard, and pommel | Establish proportions | | V2 | Volume in fittings and wrapping | Check thickness as well as silhouette | | V3 | Moonwhite, silver, dark, and red materials | Separate palette from final shading | | V4 | Cloud ornament, feather detail, static tassels | Weigh visible detail against geometry | | V5 | Scabbard cavity, attachment points, fit checks, light GLB | Inspect the complete set | | V6 | Shorten the taper by 25% | Reduce the overlong triangular tip | | V7 | Soften the tip shoulder and separate material responses | Make steel, ornament, wrapping, and lacquer read differently | | V8 | Move three red inlays by 1.8 mm at the working scale | Compare placement from the same camera | | V9 | Broaden the tip curve | Distinguish the large outline from the terminal point | | V10 | Try a small rounded endpoint | Reveal a misunderstanding of “smooth” | | V11 | Restore a short sharp point | Expose remaining bumps in joined curves | | V12 | Replace joined curves with one convex quadratic curve | Preserve the point and length while removing reverse curvature |
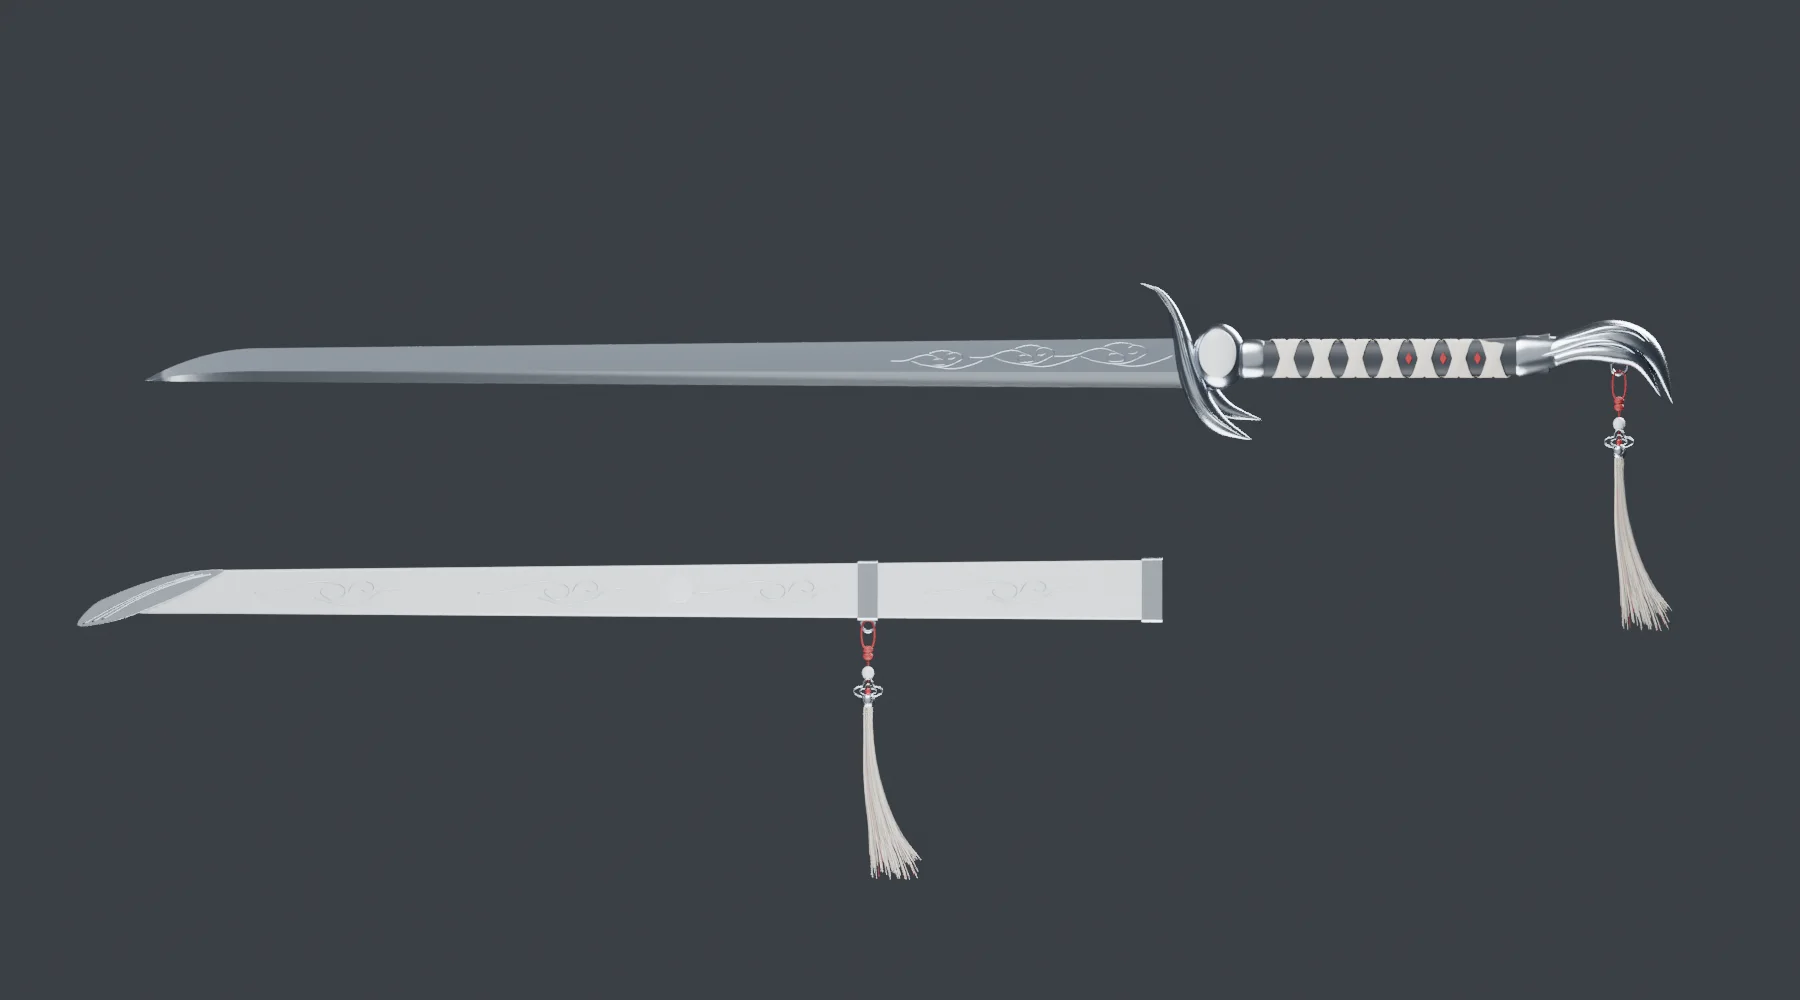
The assembled modeling result, with independent weapon and scabbard components.
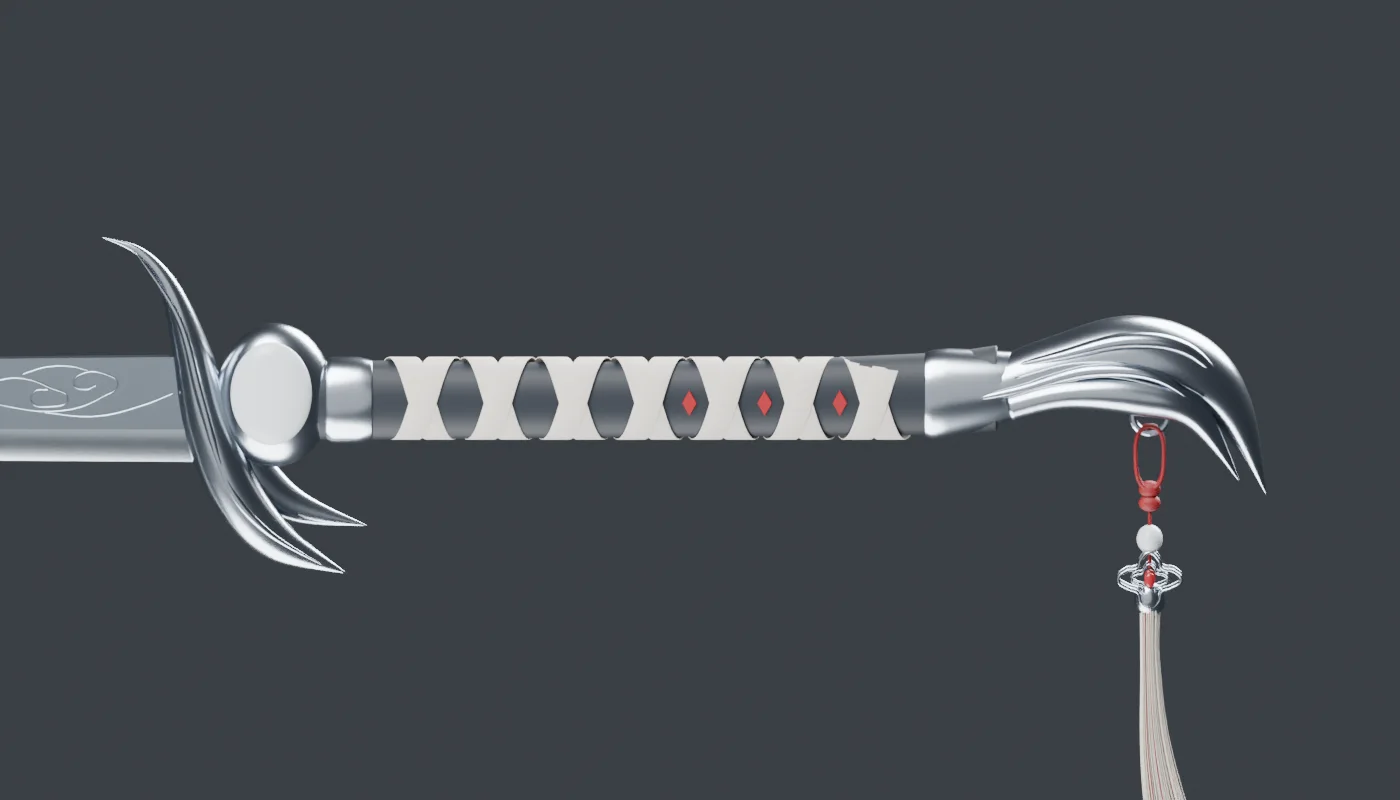
The guard, wrapping, red inlays, pommel, and tassel could be inspected separately.
The useful failure: a smooth outline is not a blunt point
V10 interpreted a request for a smoother tip as a rounded endpoint. The creator wanted a continuous large outline with a sharp final point. V11 restored the point, but stitched local curves still produced a visible bulge. V12 replaced those patches with one convex quadratic curve rather than adding another small correction.
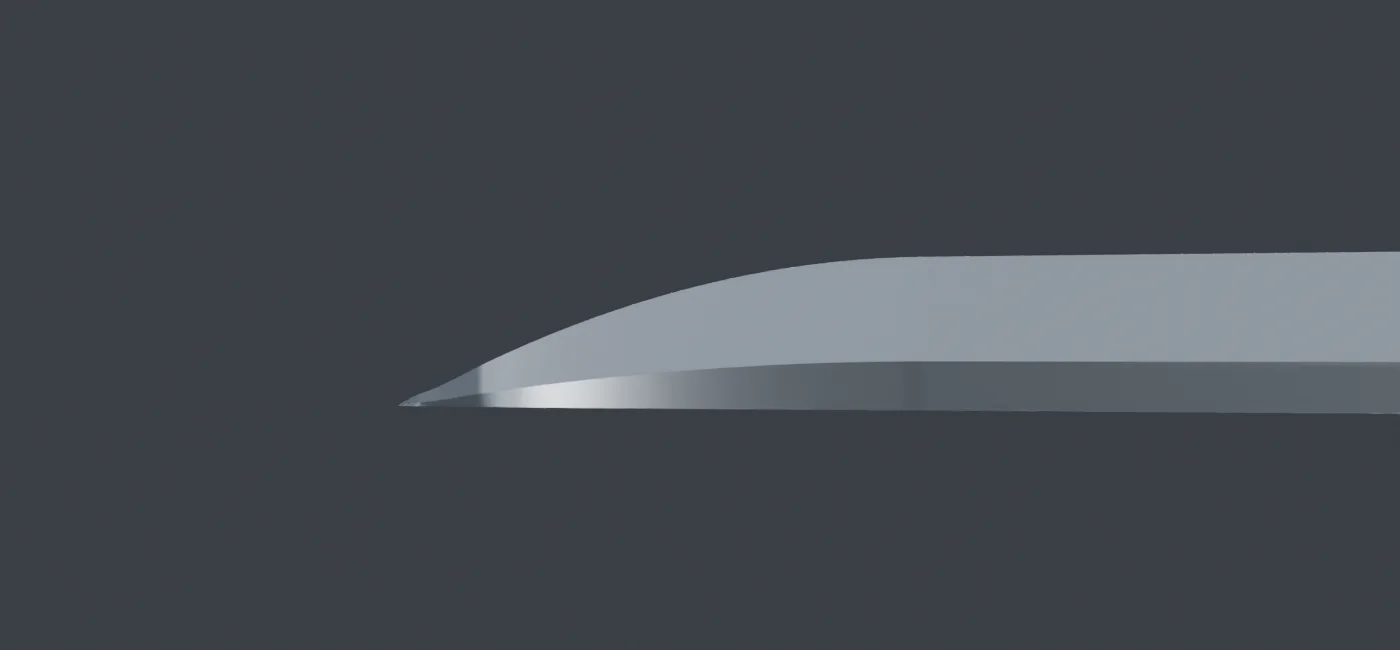
V11, inspected from a fixed camera.
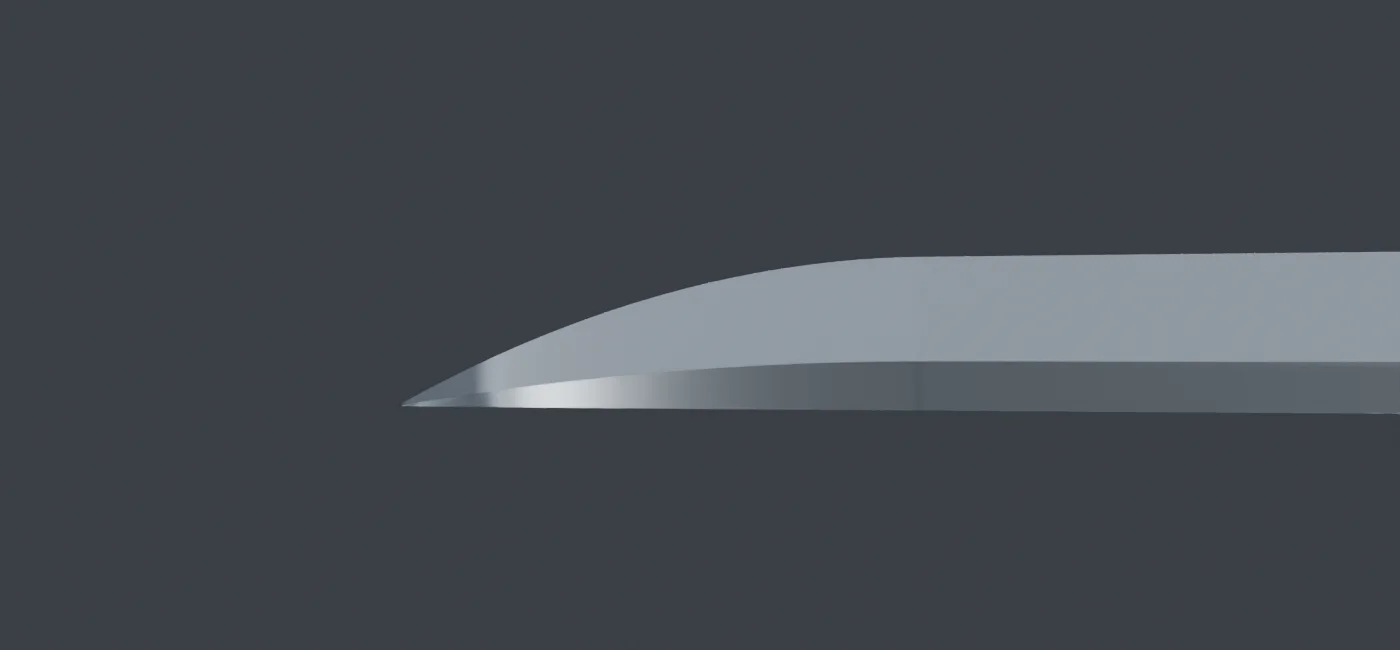
V12 after replacing the curve construction. The difference is subtle and benefits from enlargement.
The V12 checks found zero non-manifold edges in each mesh component—no edges flagged by that topology check—and passed 41 sampled positions along the static draw path. The blade profile also passed the check for reverse curvature. A geometry comparison checked that the latest change affected only the blade. These measurements complemented full views, close-ups, and macro renders: magnification finds a defect; the complete object shows whether that defect matters visually.
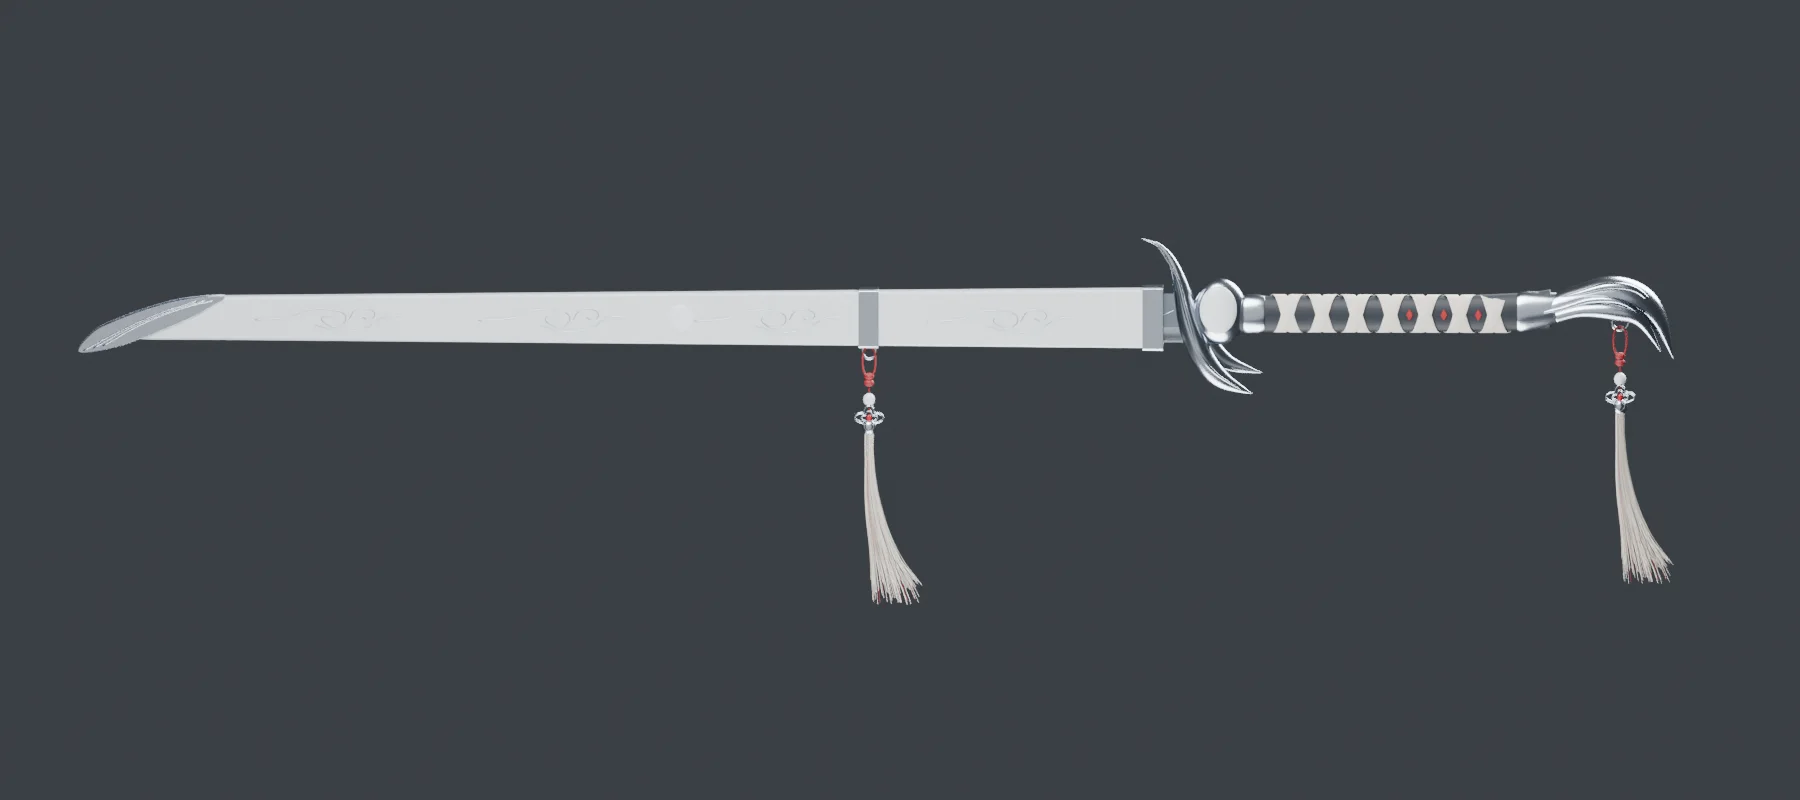
The static sheathed assembly, before judging contact during character motion.
The detailed source model contained 325,300 triangles. At that modeling closeout, the lightweight GLB was still V5, with 54,396 triangles and 1,569,020 bytes. Approved source shape, optimized export, and character integration therefore needed separate tracking. The modeling milestone alone does not identify every weapon detail in the later game package.
Once the shape was fixed, further illustrations could be rendered from the model with controlled cameras, lights, and materials. That preserves structure and ornament placement more reliably than repeatedly reinterpreting an image. Procedural materials still need runtime adaptation or baking, and painted concept detail does not automatically become sculpted geometry.
Test animation compatibility before expanding the character
Early work included a custom skeleton, procedural motion, automatic weighting, and Rigify experiments. Some candidates failed visibly. One automatic-weight attempt produced no weighted vertices at all. Later, even structurally valid candidates could still fold badly around shoulders and loose clothing.
The more useful approach was to establish an animation baseline on the source character first. If a clip already looked unsuitable there, adapting our character would not make it the right movement. If the source character looked correct but our swordsman distorted, the investigation could focus on proportions, rest poses, weights, and clothing.
The later combat work used an exact 71-bone source skeleton as its reference. Clothing support added separate auxiliary bones in subsequent character work. The project then expanded attacks on an accepted 75-bone combat rig while checking that protected mesh, rest-pose, and weight data stayed unchanged.
The reusable lesson is to choose a small set of representative poses early: a draw, a large arm movement, a turn, and a low stance can reveal problems that an attractive idle pose hides.
Treat the sword and scabbard as part of the animation
One of the most instructive mistakes was treating the sword as something that could remain permanently attached to the hand.
The source animation included prop tracks for the blade and scabbard. Those tracks mattered during drawing, hand contact, and returning the blade. One clip already contained both drawing and sheathing even though there was no separate file named “sheathe.” Judging the contents from filenames led the investigation in the wrong direction.
Playback timing also needed verification. The source motion ran at 60 frames per second; an early 30-fps preview had made it appear artificially slow. Watching the full clip at its intended speed was part of diagnosing the movement.
Source prop alignment, character hand contact, and believable grip were still separate checks. Later local repairs adjusted fingers, collar weights, and selected contact intervals. Small numerical alignment errors could verify a transfer without proving that fingers enclosed the handle naturally throughout the motion.
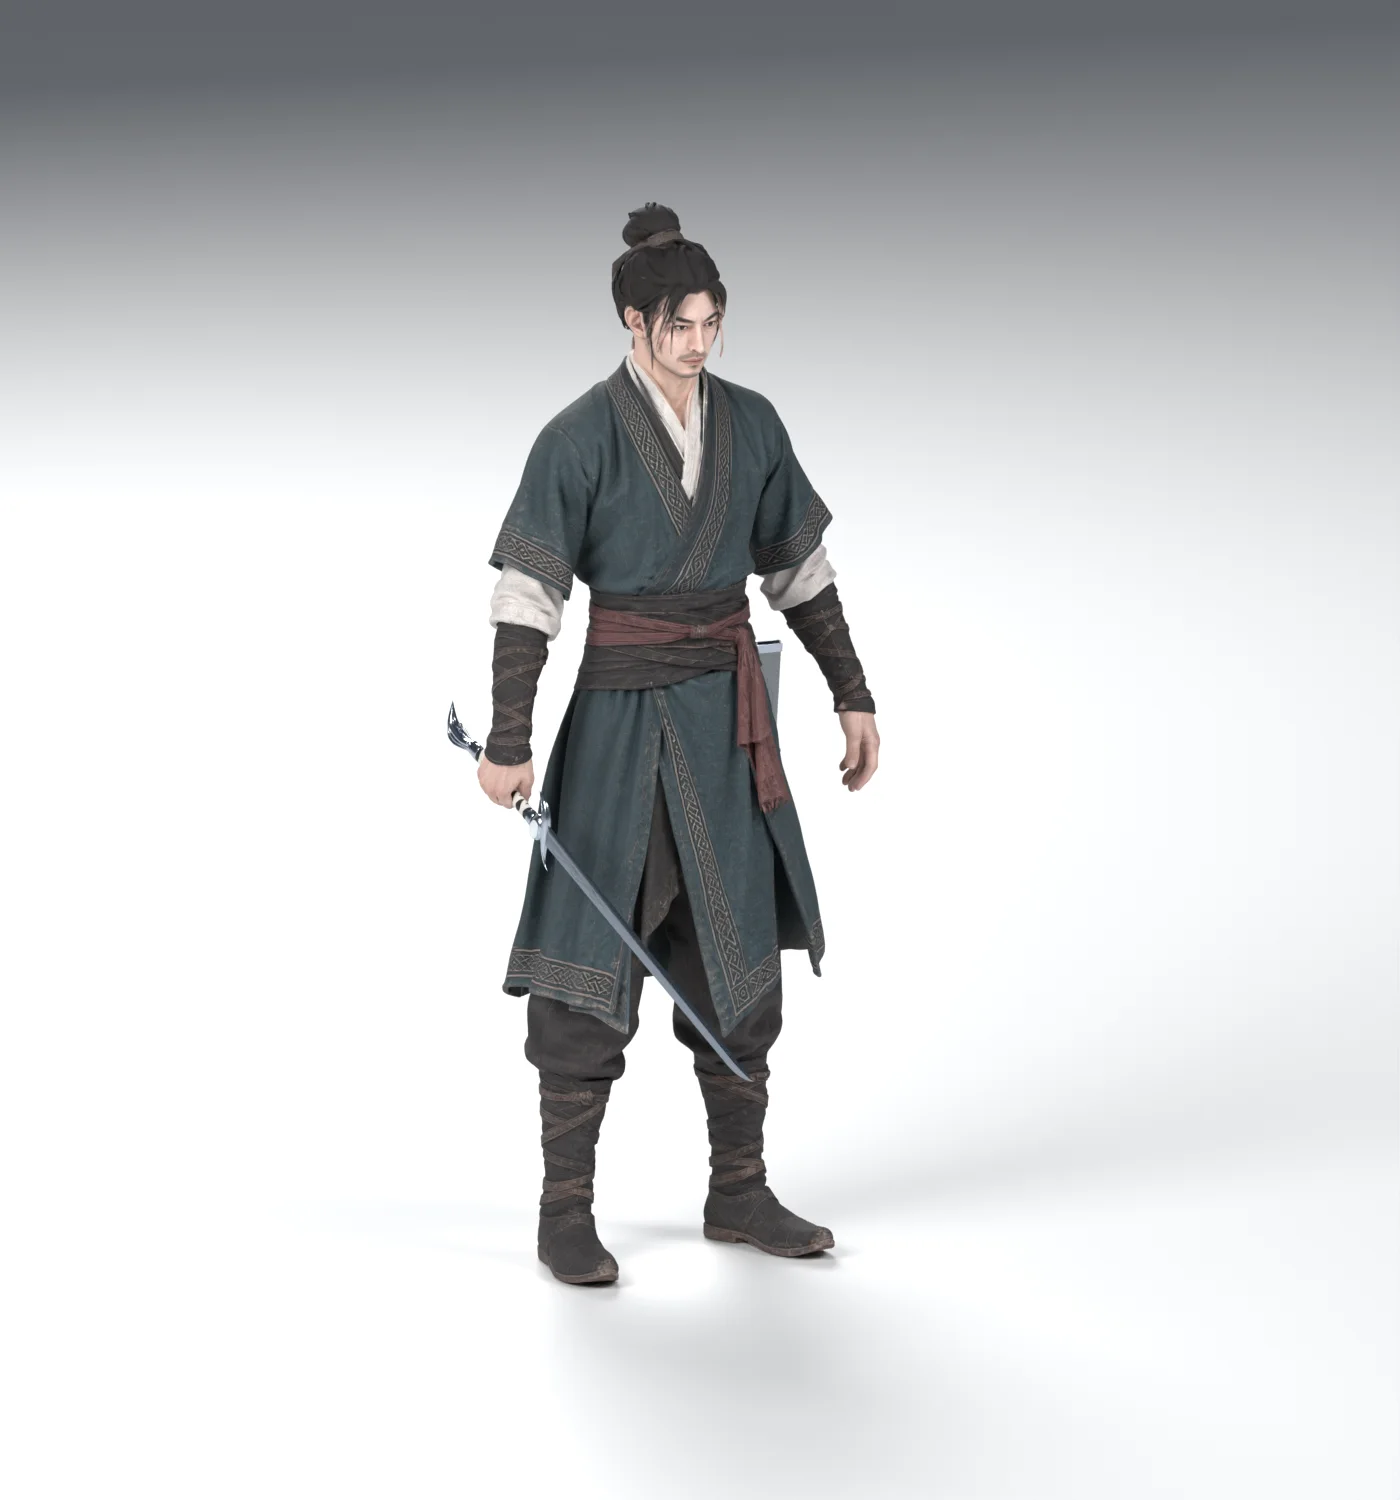
An early static fit review bringing the character and Tang-dao together.
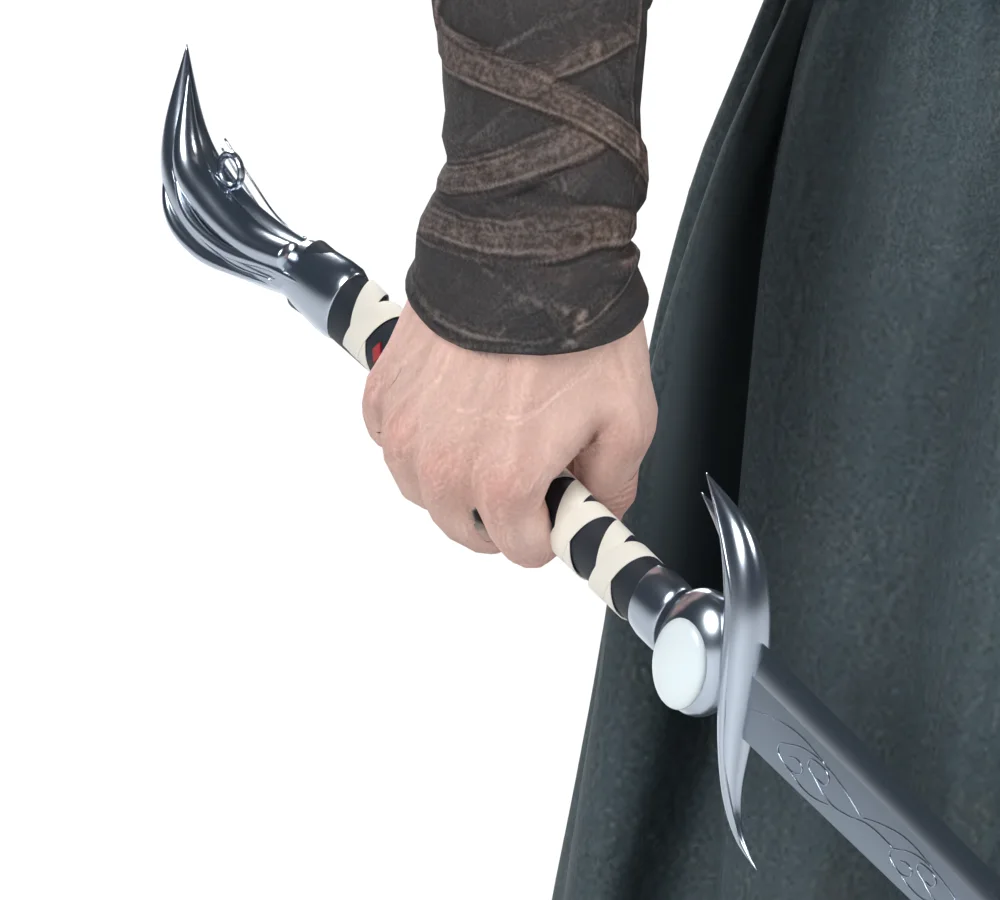
A grip close-up for inspecting hand placement. The next check is whether that contact holds through the animation.
Keep each tool responsible for a specific stage
The production chain used several tools with distinct jobs:
- Unreal Engine: load UE-format source assets and export selected animation and mesh data. Windows export work was part of asset conversion, not the game's hosting architecture.
- Blender: inspect meshes and rigs, adapt skinning, correct selected body and prop relationships, and export working runtime assets.
- Three.js: render the browser scene and play animation.
- Project code: interpret input, manage queued attacks, apply movement and damage rules, and control the boss, exit, and retry states.
Successful export gave us files to work with. We still needed to watch the motion, check its timing, and decide whether it suited the fighting style.
For another example of separating spatial design from asset assembly, see our browser 3D scene design walkthrough.
Build a playable connection between moves
The combat milestone ultimately used eight attack clips on one combat model and a shared animation mixer. Body, weapon, and scabbard tracks blended together. The charged draw reused an existing clip as a gameplay variant; it was not a ninth independently authored animation.
Player input needed its own rules. A light attack could queue one continuation. A branch input could select a different follow-up. A direct evasive step needed to interrupt only where the game allowed it. Playing complete animation files one after another would not define those decisions.
The distinction between source motion and gameplay timing remained explicit. Hit times and connection windows were tuning choices based on sampled motion. The current damage checks use distance and sectors rather than a completed blade-sweep collision system.
Locomotion also required its own acceptance. Procedural walking was replaced with authored movement and then adjusted across several iterations. The selected walking and combat rigs still have a visible transition limitation. Adding more attacks did not make that problem disappear.
Our browser FPS design walkthrough discusses another small playable project; each game's inputs and readable feedback need to be assessed in its actual runtime.
Finish the small loop, including failure
The gate encounter gave the production work a concrete destination. Defeating the boss enables the exit; reaching the marker completes the stage; the result screen offers another attempt. Failure also needs an understandable result and recovery path.
This exposed problems beyond combat. A missing defeat result could feel like a frozen game. A loading error message could be overwritten by the ordinary frame update. A recovery button could be visible but fail to receive clicks. These were interface and state problems with consequences for the player's experience.
The final local package record includes 46 passing Node tests, three packaging checks, archive hash verification, and HTTP checks for all 33 runtime files. It also records a real keyboard-input boss victory, movement to the exit, and an Enter retry in the extracted package.
Those checks establish specific behavior in that local candidate. They do not establish support for every browser, cold-network performance, or every combat branch. Repeated light attacks can currently win the duel, so the result should not be presented as finished difficulty balancing.
Package the playable stage and measure its weight
The original packaged runtime was approximately 204 MiB and contained ten GLB files plus local Three.js dependencies. Eight combat GLBs carried repeated character data. Sharing one model during playback had not removed that repetition from the downloaded files.
For the web release, we kept one complete combat model and removed the duplicate meshes and textures from the other seven files, preserving their animation data. The runtime fell to about 61 MiB—a 70% reduction. File checks, Three.js loading, and a real keyboard-input victory, exit, and retry verified the optimized candidate. The original package remains unchanged.
Deployment revealed another gap: the browser security policy blocked the blob URLs used for embedded textures. Allowing those local blob requests restored clothing and scene textures. The detail page now waits for the player to open the game before loading its models. These changes improve loading and avoid duplicate running scenes; they do not establish smooth frame rates on every computer.
The packaging work selected only the default runtime dependencies, retained a file manifest, and tested the extracted result separately from the development tree. Source models, editing files, historical experiments, and private production records are outside that runtime package.
The production method we would reuse
The workflow we would carry into the next stage is:
- Define the player action and choose representative motion before expanding the asset list.
- Inspect the actual image-to-3D output, including its missing structure.
- Verify source motion, then the adapted character, then real browser input.
- Record one hypothesis, one bounded change, and a comparable result per iteration.
- Preserve failed candidates as evidence, but stop stacking automatic fixes when a region needs a different diagnosis.
- Validate the full small loop, then measure loading and performance before promising broader support.
Zhaoye currently demonstrates a desktop single-boss stage with important remaining work in transitions, contact, balancing, performance, and broader device validation. The useful outcome is a repeatable way to move from an attractive asset to something a player can control.
Apply the lessons to your next AI game
If you are starting with an AI game generator or AI game builder, carry over the smallest useful brief: one player action, clear feedback, and a restart loop. Zhaoye combined image-to-3D trials, external animation assets, Blender work, and custom Three.js integration. It was a custom production workflow. For a first project in OpenGame Studio, start with a smaller playable idea and add complexity after testing the controls and feedback.
Explore OpenGame's browser-game collection, or start a smaller prototype with the OpenGame AI game generator. Test the result before adding more assets or mechanics.